When you connect an ISOBUS implement, MAX automatically detects the implement and that implement remains in memory (until you disconnect it?). You typically use the ISOVT window to view/edit ISOBUS implement parameters.
Some implement settings you enter in the ISOVT window populate similar fields on the MAX side—via the Current Implement panel for that implement—and typically include such fields as Width (implement width) and Number of Sections (section control). These fields will be disabled on the MAX side since they are determined by the settings in the ISOVT window. See the following topic for more information on editing implement settings.
The diagram below illustrates the parameters available when configuring and setting up an ISOBUS implement. To edit ISOBUS implement settings on the MAX side, use the diagram below in conjunction with the topics on adding an AC110 implement—these topics cover all the buttons (even the disabled buttons, such as Width and Number of Sections shown below).
Note: If your implement has only one boom, the Boom List button is replaced by the Implement Settings button, enabling you to immediately display the Implement Settings panel (without displaying the intermediate Boom List panel that is shown below).

Editing an Implement
You can edit only a currently loaded implement. The parameters available for you to edit are different for ISOBUS and non-ISOBUS implements because most ISOBUS implement configuration settings are typically available from the ISOVT window.
Note: You cannot edit the implement name. See the two diagrams below that illustrate what you can edit for both ISOBUS and non-ISOBUS implements.


To edit an implement:
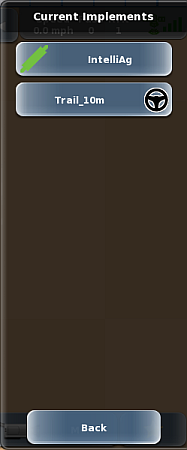
1. Press Menu > Implement Profiles > Current Implements. The Current Implements
panel appears, showing all current implements.
Note: If there is only one implement, the name of the panel is Current Implement
(singular).
2. Press the implement you want to edit. The Current Implement panel appears.
3. Edit your preferred settings, similar to entering the settings when adding an implement.
Each implement you create in Outback MAX is saved to memory creating a list of implements.
When you load an implement it will use the dimensions and any section and rate control setup
for that implement. If you connected an ISOBUS implement, you can load one or more (or all)
the booms associated with that implement.
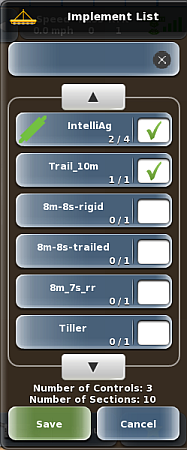
The Implement List panel (at right) shows all the implements on your MAX terminal (any new,
imported, or ISOBUS implements). The numbers on the lower right of an implement button
indicate the number of booms for that implement that are currently loaded followed by the total
number of booms for the implement. For example, on the panel at right, the first implement in
the list is an ISOBUS implement with two current booms from a total of four booms (2/4) and the
second implement is a single-boom implement that was created/imported and is currently
loaded (1/1).
MAX allows a maximum of five booms to be active (current) at any time; thus, you cannot load
any more booms above this limit. You can load multiple ISOBUS booms, but you can load only
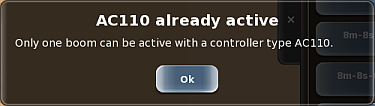
one AC100 implement/boom. For example, panel at right has three current booms (controls).
You would be able to select up to two more booms; however, if Trail_10m is an AC110
implement/boom, the following error message appears when you select another AC110
implement/boom.
When you try to select a sixth (or more) boom, the Number of Controls text at the bottom of the
panel turns red and the Save button is disabled.

To load an existing implement:
1. Press Menu > Implement Profiles > Implement List. The Implement List panel appears. Any current
implements have a check mark (such as the IntelliAg and Trail_10m implements shown at right).
2. Press Filter then select a type to show only implements of that type in the scroll list. Pressing All Types (default) displays all implements in the scroll list, regardless of type.
3. Use the up/down scroll buttons to scroll through the list of implements (if necessary) then press to select the desired implement. The panel closes and the selected vehicle appears on the Current Implement button.
4. Press Back/Close repeatedly or press the Close arrow to close the panels and return to the map.